
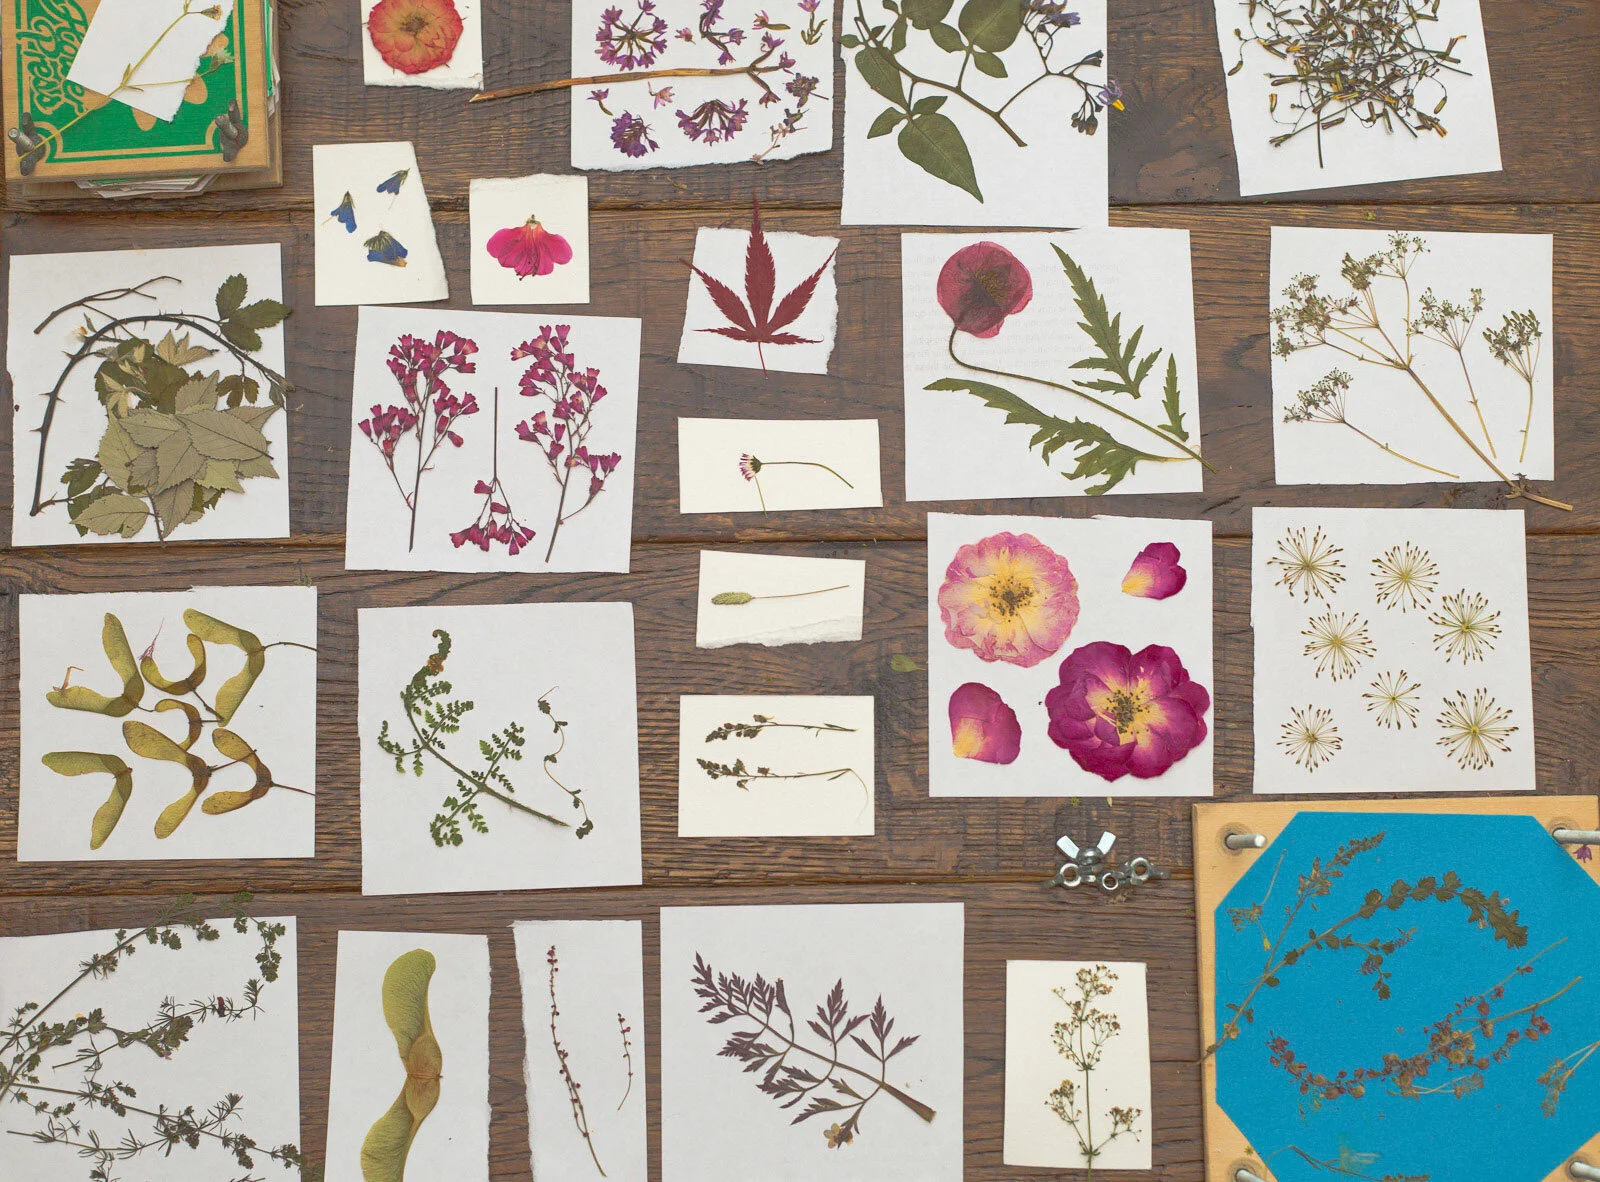
Helen Ahpornsiri
Pressed Plant Artworks
Based in East Sussex, UK, I grow and collect flora, foliage, and seaweeds which I preserve with traditional flower pressing methods before delicately re-imagining them into artworks.

Working with Nature
I work with a variety of flora, preferring fern and wildflower species. Flowers commonly considered weeds are unassuming yet familiar, they can be embued in folk tales and personal connotations which resonate with people in different ways. I’m interested in the idea of preserving plants like these and giving them a new narrative.
A guiding principle I follow in working with natural materials is always to contribute more than I take.
The majority of the plants I use in my work are grown in my small garden. Selected flora is cut for pressing, leaving the rest of the plant to continue growing and providing for the local wildlife.
If foraging from the wild, I follow the BSBI code of conduct. I only collect small specimens from abundant species, being careful to cause as little disturbance to the environment as possible.
Some artworks are made using pressed seaweed. The seaweed is foraged in small quantities at high tide when washed up on the strandline, or low tide when loose pieces are collected in rockpools, and always with permission from the beach owners. Care is taken not to remove any seaweed from its holdfast.

How to Press Flowers
Flower Pressing a great activity for both children and adults. It is a wonderful way to discover, appreciate, and build a connection with, the natural world.
Presses can often be found in second-hand stores or made using wood, bolts, and wingnuts/straps. Even an old book can be used as a flower press.
Below are some step-by-step instructions. Happy pressing!
Step 1: Picking your flowers
Most plants that are quite flat will press nicely. There is a lot of trial & error in flower pressing, try the different flowers and leaves around you and see what works. Some of my favorite plants to press are ferns, forget-me-nots, queen anne’s lace, and violas. Excess moisture on your flowers should be avoided so try not to pick on rainy days or dewy mornings. If picking from a garden, only pick a few flowers at a time, as it’s best to keep them as fresh as possible before pressing.
Step 2: The first layer
For the first layer in your flower press place a sheet of corrugated cardboard and one or two pieces of blotting paper (other papers will work - I often use sheets of cartridge paper from old sketches, but blotting paper helps remove more moisture). Position your fresh flowers on top of the paper, thicker plants can sometimes be cut in half to make pressing easier. If using a book, place your blotting paper and flowers between the pages leaving a pinch of pages between each layer.
Step 3: Filling your flower press
Now cover your layer of flowers with another sheet of paper and more corrugated cardboard. Repeat this layering (Cardboard/paper/flowers/paper/cardboard) until you’ve placed all of the flowers you want to press. Place the top on your flower press and tighten the bolts/straps to medium/high pressure. If using a book, carefully place heavy books on top of your flower-filled book.
Step 4: Storing the flower press
Keep your flower press in a warm dry place, like an airing cupboard. Warm air passing through the gaps in the corrugated cardboard will help dry out your plants quickly, which keeps the colour bright.
Step 5: Checking on your pressings
After a few days check on your flowers, some of the paper may need replacing if it feels cold or damp. If the paper feels dry leave your pressings as they are and close the flower press.
Step 6: Opening the flower press
Most plants will be ready to remove from the press in around three weeks. It can take a little more or less time depending on the thickness and moisture content of the plants. Folded paper or envelopes are handy places to store your finished pressings. There are all kinds of crafts you can now do with your pressed flowers, if using them to make pictures most craft glues will work well, just make sure they are acid-free.
Where to get your flowers
I would encourage anyone interested in pressing flowers to grow their own, it’s incredibly satisfying, can inspire numerous nature-related activities for children, and, provides for pollinators. The easiest place to start is by sprinkling a packet of wildflower seeds, they are easy to grow and most species are great for pressing.
If picking from the wild be aware of the rules governing plant collection in the areas you go, only take from abundant species being careful not to cause disturbance to the environment, and, never uproot a wild plant. Learning about the local flora creates a more enriching experience, you can take an identification book, use mobile apps, or identify the plants when you return home. You could create a herbarium noting down the species, location, and date the plant was collected. Remember that many plants will wilt quickly, and you only need a small handful to fill a whole press.
Many bouquet flowers from florists & shops press well. You may want to separate and press some of the individual petals rather than the whole stems as the plant species are sometimes quite dense or bulky. Pressing flowers from a bouquet can be a way of preserving the memory of a special day or gift.
If you have any questions about flower pressing please feel free to send me a message via the contact link at the top of the page, or through social media.